Thursday, November 5, 2015

A Christmas Carol


Wow, so I haven't gotten my hands into a mini album in a while and it was so fun and refreshing to do it again.  I used "A Christmas Carol" from G45 (which I've been told they are out of print now, but you can still purchase some at Country Craft Creations).  Also, I used a new binding system by Tamra Merrill called the Hingeless Waterfall, and it is quite genious!  It was such a fun project to make and just in time for the fun holiday season. 
 
I did make a few adjustments (as I seem to always).  My album size is quite different in size than Tamra's (smaller) and I may have put the cover together a little differently.  Anyway, I thought I would list the sizes here in case you'd like smaller size dimensions.  Then you can follow Tamra's video it putting it together.  :)
 
Cover pieces (chipboard):
cut 1 (front right side)-  7(h) x 6(w) 
cut 1 (front left side) - 7(h) x 4 1/2 (w) 
cut 1 (back) - 7 (h) x 7 1/2 (w)
cut 2 (spines) - 7 (h) x 2 (w)
 
Left side Waterfall (on the inside):
Cut 1 (base piece) - 6 1/2 x 4 1/4
Cut  6 (waterfall pieces) - 4 3/4 x 4 1/4 (score at 1/2)
 
Hingeless Waterfall (center on inside):
Cut 1 (base page) - 7 1/4 x 6 3/4
Cut 6 (main pages) - 6 3/4 x 5 3/4 (score at 1/2, 1, and 1 1/2)
(makes the pages 6 3/4 x 4 1/4 when finished scoring)
Cut 1 (part that holds the main pages down) 7 1/2 x 2 (score at 1/2)
 
Random Flips (right on inside):
Cut 1 (base) - 7 1/2 x 5 1/2 (score at 1/2)
Cut 1 (middle that connects to hinge, on top of base) - 5 1/2 x 8 1/2 (score at 5 1/4)
 
Also, I made this using only 9 pieces of 12x12 designer paper (from my winnings at Tamra's last crop hop event in September).  I only had 3 pieces left,  (about 1x2).  To do this I made my pages so the designer paper would be 4" wide on most of the pages.  Then I cut most of them at 6" in height (which isn't quite tall enough, but then I used a designer punch and black cardstock to fill the gap).  I also added about 5 journaling spots from cream cardstock to fill in any extra spaces. 
 
 
Photos of my completed album:


This is what the right side 'random flip' pages looks like when opened.
 
So much fun, gorgeous paper, great tutorials.  Happy Holidays!
 

Monday, November 2, 2015

Alice in Wonderland


Whooo!  What a fun, crazy month October was.  For the first time ever, I talked all my kids into doing a family theme for Halloween ...

Alice in Wonderland!

I started planning way back in August for this event and I wanted to get it done early on in October, so their would still be time to do all the fun things that crop up at the end of October (which is exactly what happened :) It actually started out as a stylized photoshoot for my girls and grew...we usually do a fun Halloween party with a game and dinner, so I thought I'd have it serve as both purposes.  Soon my house received a makeover and it became Wonderland.  Looking back, I think I'm going to SIMPIFLY the stylized shoot and do it sometime next year instead.  I had so many people say that they wanted to 'walk through' our Wonderland, but most were too busy, so ... I'm bringing my craziness to you :) 
 
Last year, our house became Hogwarts School of Witchcraft and Wizardry (blog link to those photos here) and we did a 'play' where the kids had to act their characters as they solved the mystery.  I couldn't think of a play for Alice.  Instead, however, I found the walk through to a video game called "Trapped in Wonderland."  I began reading through the cheat sheet and realized that this would be the basis for our party this year.
 
The "Trapped in Wonderland" story for our party ...
When everyone arrived for the 'Frabjious Day Feast' at the Queen's Castle, they found the door locked. 
 
 
The only other option was to go 'Down the Rabbit Hole.' 
 
 
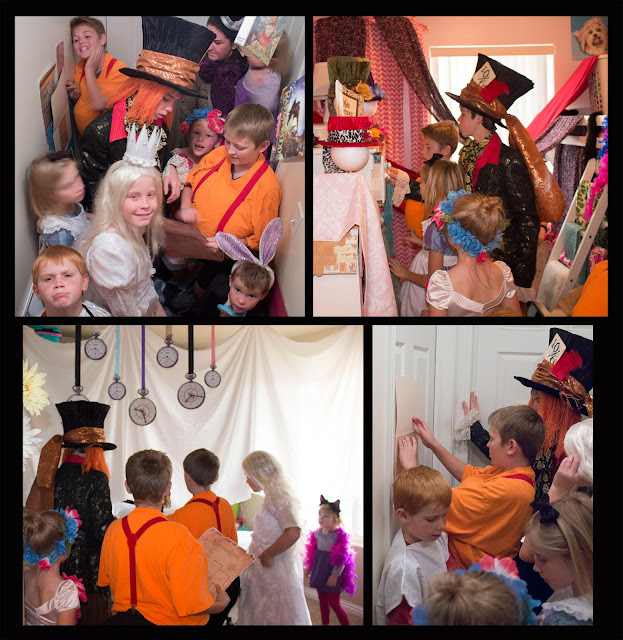
In a small space was a book cabinet and some clues.
 
 
To get through the tiny door the kids had to solve the clues, which would eventually give them a 'key' and a 'drink me' bottle


... that made them small enough to fit through the door.  (Not really, but it was really fun to watch them all squeeze through the door in their costumes .. he he). 
 
 
The small door opened into a flower garden, which were huge, because everyone had shrunk ...he he.  
 
 
At the end of the flower garden was Absolume (the caterpillar), who had a message and instructions on how to get out of Wonderland. 
The message basically said, "You are trapped in Wonderland!  To get out you must fix the portal (which was a mirror that you had to find all the broken pieces to).  Also, to get into the 'Frabjious Day Feast' you have to find the 'Key of Hearts' hidden in Wonderland."
 
 
"Oh, and have a mushroom."  (which allows you to return to normal size) 


From here, the kids entered the 'Wonderland Forest,' where three chests, with locks, were located ...
 
 
The kids could also visit the 'Mad Hatter's Tea Party' ...
at each location there were clues hidden.


Three rooms in our house could NOT be entered until AFTER the code(s) were broken ...
(examples of some of the codes the kids had to break)
 
 
In one room was the Mad Hatter's Workshop ...
 
 
where they had to break another code to find more clues.
 
 
Another room was the time room, with another code to break ...
This room later became the 'White Queens kitchen' and the place where she mixed potion.
 
 
The last room was 'The Cave of the Jabberwalkie,' where the last two clues where hidden in the remains of the Jabberwalkie (the last broken mirror piece, and ...
 
 
the key to the last chest holding the 'Queen of Hearts Key.'
 
 
Once through the portal and out of Wonderland, the kids took the key back to the 'Red Queen's Castle' and entered for the 'Frabjious Day Feast.'
 
 
The kids had sooo much fun solving all the clues and finding the pieces.  My kids had fun helping me with the decorations (which took us a couple weeks :)  and they were so excited to play their parts.  We had some good friends of ours over for dinner the first time.  Later, we did again for a few other people who wanted to 'walk through Wonderland' and the kids played different role parts, while their other friends solved the clues (it was so fun to watch them act their character roles).  I may have gotten a tad bit carried away, he he he, but it was a fun time!
 
 
Costume Role:


Friday, October 16, 2015

Shadow Box Foto Folio

 
Yah!  It's my favorite time of year again - FALL!  This year has just flown by.  I've been focusing on my photography skills and business more this year, and been quite involved with a musical theater lately, so I haven't been doing much paper crafting.  However, I was so excited to pull out the Halloween décor, and find this project again :)  It was a popular one last year, so I thought I'd share it again.
This is a foto folio project that doubles as a home décor piece.  My kids love to get it down and look at the memories hidden within, EVERY YEAR!  It doesn't just sit on a shelf and collect dust  - it is well loved.  Even when company comes they ask about it and enjoy the quick look through (now that is a successful project :)
The pattern for this project is on sale on my website right now (here is the link to the pattern).  And here is the 'how to' you tube video that accompanies the project
 
Happy Halloween!


Friday, October 2, 2015

Harry Potter Halloween Mystery and Feast

 
I've wanted to do a Mystery Dinner for a few years, but it hasn't happened.  This year I decided I was going to do my best to make something similar happen, as a new, fun family tradition.  After much searching the web I came across 'just Sweet and Simple' blog and loved all of the ideas, printouts, and mystery dinner story.  After reading through it however, I knew my kids were still too young, so ... I decided to make a Harry Potter Mystery for kids (kind of like a play, they act out impromptu as they uncover the mystery).  With some help from my creative husband, I wrote a children's script that can easily be adapted to any household and any number of people (their are a few, short, adult parts as well). That story and print outs are at he bottom of this post. Then I set to work turning our home into the world of Harry Potter. Most of my print outs and lots of my décor ideas (and tutorials) came from 'just Sweet and Simple' blog Mystery Dinner party.    Otherwise I tried to use what I had to make it fun.  My son folded these origami owls from newspaper.to deliver the invitations.  Then we painted them black and added some googly eyes.


I like to use plastic table cloths to cover the walls and furniture (like entertainment centers, shelves, cubbies, etc.) for the evening.  You don't even need tape often, because they are so staticy, they just stick.


I used a brown hand towel and some raffia to make Mandrakes ... lol!


Random spooky things from the Halloween section at thte local stores http://sharinashack.com/wp-content/uploads/DigitalProducts/MysteryoftheStolenCandy.zipfit the Harry Potter theme well.


Tutorial for this fun wall is on 'just Sweet and Simple' blog
 
 
I love to use large cardboard boxes to create (I guess I never grew out of it as a kid).  Add a bit of paint here and there for a fun look.  Then hang some lights and some spooky cloth.
 
We transformed out garage into the Great Hall, with a bit of paint and some card board boxes.  We had a pot luck taco salad bar with treats and butter bear (root beer).


Tutorial for the sorting hat is on the 'just Sweet and Simple' blog.


My family was awesome and enjoyed playing along, including wearing costumes to fit their characters (can you guess who is who?)  After the feast we played Halloween games in the Great Hall and enjoyed each others company.  We videoed much of the event and have enjoyed watching it many times (the best of home videos, nothing fancy).
 
 
We had so much fun doing this, we'd like to share it with you.  Here is the pdf script to "The Mystery of the Stolen Candy."  Also included are the memos/script, and evidence you need to complete the mystery.  Replace the 'character' names on the pdf script with the characters you've chosen to read each part (example: Harry, Hermoine, Luna, etc.)  Print the 4 script sheets, and evidence sheets on cardstock.  Put the 4 script sheets back in your printer and print the MEMO sheet on the back of each one.  Cut out the cards and laminate them.  Then you can write on the line above the MEMO the characters name.  I taped the memo cards in the corresponding room they would be read in, so they would be easy for the characters to find each part.  Have fun!