Hello there ... I'm back with another mini ablum. The "Elf on the Shelf" idea for Christmastime is becoming a more popular idea each year. Santa sends an elf to watch your kids, on December 1st, to make sure they are being good throughout the season. But every night he/she comes to life and does mischieves things. This was our first year doing it. It was so fun to see my kids faces as they discovered what "Tinsel" (our elf) had done that night. I decided to make a mini ablum to display all the memories Tinsel helped us make. Here is an inside look at how I create mini ablums ...
STEP ONE, choose the mini book! I knew I needed an album that would hold a lot of pictures. So I went to UTube ... (great place for ideas and tutorials). I decided on the "Vertical Paper Bag Mini" by Ginger of MySistersScrapper for the main page assembly. In the photos, my paper bags happen to be the red and white candy cane stripe. I also needed a way to bind the album; and I am a fan of Kathy Orta's "Stack the Deck Binding System" (also on UTube).
Once I decided on the album it is time for STEP TWO: organize the album. Sometimes I draw it, but this time I quickly drew a paper bag shape on my computer and just printed a couple sheets of it, as well as a spot for other information like the title of each page, how many pictures, etc. Since I knew I needed one page for each day I was able to sketch the ideas as the days went along in December, plus it helped me keep track of any information I might need, and plan the type of pictures I should take for each day. (I actually started this project mid-December so you don't have to know what your doing before the event starts :)
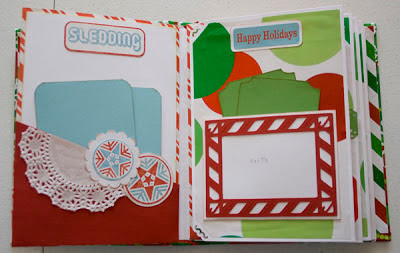
STEP THREE: create the album. Follow Ginger from 'My Sisters Scrapper' and Kathy Orta 'Stack the Deck Binding System' for the album assembly. Believe it or not this is only 6 paper bags (perfect for a into page, and 25 days til Christmas). My album has a chipboard cover and binding. I couldn't find any pattern paper to match my bright, cheery paper bags so I just sat in my craft room looking around. My eyes spotted this years wrapping paper and I thought it went perfectly, so ... yes, I used wrapping paper for the decorative paper in this ablum :) Other than that I used solid cardstock (white, red, green and blue). The spread here is the back of the front cover (left), first paper bag (middle), and cardstock flap in the open position (right).
The spread here is paper bag (left), flap in the closed position (right).
STEP FOUR: decorate your album. One side of the paper bag makes a great pocket, but I like MORE pockets so I added a few, in many different shapes and sizes, as I liked. I also used dollies, random stickers from three or four left-over sticker sets, a random cricut cartridge, some fussy cutting, corner and edge punches, etc.
STEP FIVE: print and add your pictures. I made most of my photo mats to fit a 3x4 photo.
Ta-da! Darling mini-album (a fat one I might add). My kids (and their friends) have had a great time looking back at their first Christmas with Tinsel and speculating what he might do next year! Hope this little post inspires you to save a memory, be creative, and have fun everyday!


No comments:
Post a Comment