Monday, February 8, 2016

Valentines Paper Crafting Ideas


When I pulled out my Valentines decor this year, the bird cage I made last year was ... squished and looked like a lot of work to fix.  Later I walked by a shelf that I had placed a red painted mailbox that I purchased at the DI a couple of years ago (and hadn't yet covered and decorated -although that was the plan :)  Suddenly the destroyed bird cage and the unfinished mailbox clicked in my head.  I covered the (already painted red) mailbox with some leftover paper.  I pulled all the pretty elements off of the bird cage (the flower, burlap bow, sparkle heart, butterfly, etc.) and rearranged them on my mailbox -then glued them down.  It took about 5-10 minutes.  Later that day (when I had 20 minutes) I made some cutsy envelopes with the scrap papers to go inside the mailbox.  Oh, and by the way the paper I used is from a Back to School collection (Graphic 45 ABC Primer) and has nothing to do with Valentines Day. LOL  Who knew!!!
 
Moral(s) of the story:  1) it's okay to reuse bits and pieces from past projects or décor (and it saves time).  2)  When inspiration strikes- go with it!  :)  3) use the paper and elements you have lying around to create new adorable things.
 

Of course this little project redue got my brain paper crafting, so I decided to make a few more bits with the other pieces of leftover paper I had lying around.  This frame was supper quick.  I cut the background piece the size of the frame (5x7), then I cut out enough hearts to fill the frame.  I bent them in half and adhered them down using only the center crease.  It is a perfect, coordinating element with my mailbox. 


Have a LOVEly Valentines Day weekend!!!

Tuesday, February 2, 2016

Valentines Pillows


As I looked around my Valentines décor, I realized that I was lacking some textiles.  After a short search on Pinterest to get some ideas (that means you have to limit your time looking at ideas or you could spend all day looking and no time creating), I found myself interested in pillows.  So I pulled out my red, black, and cream fabric stash.  The pillow embroidery (below) I had finished a couple of years ago, but hadn't decided how I wanted to display it yet.  My girls came in and quickly jumped on board wanting to make a fun project as well - so they joined me (I love it when they do that!!)   It takes longer, cause I end up helping them, oh, but it is totally worth the extra time to be with them, building a fun memories and loving relationships, as well as teaching them all these fun skills!!
 
To make the pillow above (and the one's my girls made) ...
1.  I simply cut a heart from a piece of scrap paper (we all have different heart patterns). 
2.  We took bits of scrap fabric and ironed them onto "Heat n Bond" iron on adhesive (can get it at     Walmart or JoAnns).  Then we traced our heart patterns onto the fabric bits and cut them out. 
3.  Remove the backing "Heat n Bond" from the hearts and lay them on the front panel of your pillow till they are where you want them and the order you want them (as you can see, we have different ideas about style :)  Iron the hearts into place. 
4.  Take a needle and embroidery thread and do a running stitch around each heart.  You can change it up for XXX's or other stitches as you desire. 
5.  Add any other elements to your pillow now(we used buttons). 
6.  Then place the back panel and decorated front pillow RIGHT sides together and sew the pillow together LEAVING a 3-4 inch hole in the center of one of the sides of your pillow. 
7.  Stuff your pillow, then stich the hole up using a blind hand stitch.  
 
Note: (insert this step between 5 and 6), if you want to add fringe to the edges of your pillow, pin the fringe into place between the to layers of fabric (the fringe on the inside of the pillow), then sew the pillow up.  If the fringe is a bit crazy (like mine is), base stitch it to front panel of your pillow before sewing the pillow together.
 
To make the pillow below...
1.  Sew a simple embroidery scene (make it up or find a pattern) on a 8x8 pieces of muslin with "warm and natural" (looks like felt). 
2.  Cut 2 1/2 - 3 inch strips of various fabric pieces for the different sides of your pillow.
3.  Sew the strips of fabric to the desired sides of your pillow. 
4.  Cut a back fabric for your pillow the same size as the pillow front. 
5.  Then place the back panel and decorated front pillow RIGHT sides together and sew the pillow together LEAVING a 3-4 inch hole in the center of one of the sides of your pillow. 
6.  Stuff your pillow, then stich the hole up using a blind hand stitch.  
 
Have a little fun with the ones you LOVE creating these HEART warming pillow ideas!!


Here are the pillows my girls made... they had so much fun and it didn't take too long (so they were able to stick with the project till it was done).  We laughed a lot, learned a new skill, and just enjoyed chatting with each other!!

Monday, January 25, 2016

Coffee Filter Wreath for Valentines

I needed to fill a space in my home with a touch of color, but really didn't want to go to the store and get some supplies.  I found an idea on Pinterest to make a coffee filter wreath (filters make great preschool projects and we use them often around our house).  Then I visited you tube for some extra instructions (PS there are a lot of tutorials to make this, just pick a couple to watch for some tips).  
 
Here are the written instructions:
1. Cut a heart out of cardboard the size and shape you want.  (Mine was about 1 1/4 inch thick, but the heart was cut from a piece of 8.5x11 piece of paper, traced to cardboard and cut out).
 

2.   Then I just squished the coffee filters up in my hand with no specific folding technique, just very random.  A tip: Have all the outside edges meet up at the top somehow and the center of the filter a point at the bottom. 
3.  Then I bent the point at the bottom over 1/2 inch or so and adhered it to the edges of the wreath (outside and inside edges). 
Repeat squishing and folding the filters, and adhering them to the cardboard heart, until the wreath is full.
 

At this point you can leave the wreath as is, if you need a white one.  But I needed a pinkish one. :)


4.  So I mixed 3-4 drops of acrylic paint  (red makes a pinkish color) in a container and added 1/8 cup of water to it.  With a brush I mixed it up and proceeded to paint (carefully) the wreath lightly - as the filters soak the water in quickly.  This gave my wreath a more rugged and distressed feel.  I believe you could also dip the edges of your filters in the same mixture, then let them dry before squishing them and adhering them to the cardboard base.  But I really liked this imperfect shabby look :)

 
Voyla!  A splash of color to your home in a relaxing afternoon project!!


Quick & Easy Valentines Flower Vase


During this time of year, things around my house calm down a bit and I start to get crafty again.  I saw this idea while looking at facebook one evening and just fell in LOVE with it!  I had just picked up a little bouquet of flowers from the dollar store also, and knew it would be the perfect vase to go along with the Valentines color scheme for my house. 
 
I found a heart sticker from my stash of stickers and stuck it to the jar.  In the garage I gave it a quick coating of paint.  After it was dry I wrapped some twine around the top.  It needed a little more cream color to it, so I used a bit of lace.  I wanted to add a little red to the bottom portion of the vase so I punch a couple hearts from some scrap paper and glued them to the ends of my twine bow.  A little stitch marking to go around the heart to help see it better, some flowers in the vase, and quick, easy instant Valentines vase for your home décor!

Thursday, November 5, 2015

A Christmas Carol


Wow, so I haven't gotten my hands into a mini album in a while and it was so fun and refreshing to do it again.  I used "A Christmas Carol" from G45 (which I've been told they are out of print now, but you can still purchase some at Country Craft Creations).  Also, I used a new binding system by Tamra Merrill called the Hingeless Waterfall, and it is quite genious!  It was such a fun project to make and just in time for the fun holiday season. 
 
I did make a few adjustments (as I seem to always).  My album size is quite different in size than Tamra's (smaller) and I may have put the cover together a little differently.  Anyway, I thought I would list the sizes here in case you'd like smaller size dimensions.  Then you can follow Tamra's video it putting it together.  :)
 
Cover pieces (chipboard):
cut 1 (front right side)-  7(h) x 6(w) 
cut 1 (front left side) - 7(h) x 4 1/2 (w) 
cut 1 (back) - 7 (h) x 7 1/2 (w)
cut 2 (spines) - 7 (h) x 2 (w)
 
Left side Waterfall (on the inside):
Cut 1 (base piece) - 6 1/2 x 4 1/4
Cut  6 (waterfall pieces) - 4 3/4 x 4 1/4 (score at 1/2)
 
Hingeless Waterfall (center on inside):
Cut 1 (base page) - 7 1/4 x 6 3/4
Cut 6 (main pages) - 6 3/4 x 5 3/4 (score at 1/2, 1, and 1 1/2)
(makes the pages 6 3/4 x 4 1/4 when finished scoring)
Cut 1 (part that holds the main pages down) 7 1/2 x 2 (score at 1/2)
 
Random Flips (right on inside):
Cut 1 (base) - 7 1/2 x 5 1/2 (score at 1/2)
Cut 1 (middle that connects to hinge, on top of base) - 5 1/2 x 8 1/2 (score at 5 1/4)
 
Also, I made this using only 9 pieces of 12x12 designer paper (from my winnings at Tamra's last crop hop event in September).  I only had 3 pieces left,  (about 1x2).  To do this I made my pages so the designer paper would be 4" wide on most of the pages.  Then I cut most of them at 6" in height (which isn't quite tall enough, but then I used a designer punch and black cardstock to fill the gap).  I also added about 5 journaling spots from cream cardstock to fill in any extra spaces. 
 
 
Photos of my completed album:


This is what the right side 'random flip' pages looks like when opened.
 
So much fun, gorgeous paper, great tutorials.  Happy Holidays!
 

Monday, November 2, 2015

Alice in Wonderland


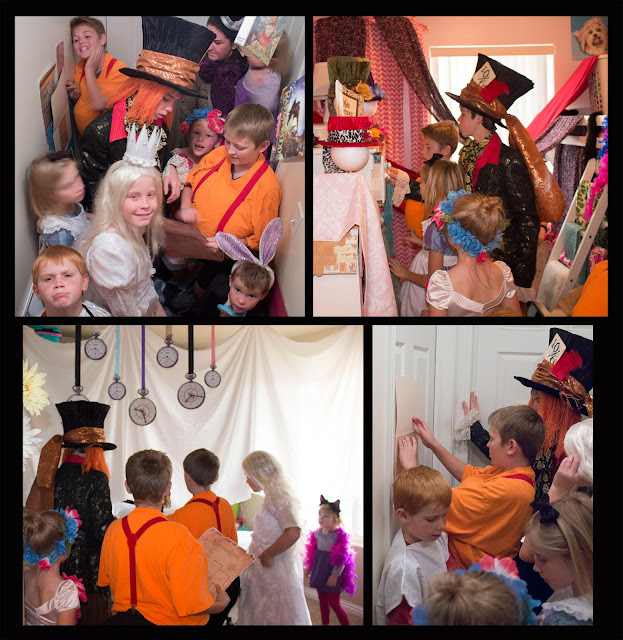
Whooo!  What a fun, crazy month October was.  For the first time ever, I talked all my kids into doing a family theme for Halloween ...

Alice in Wonderland!

I started planning way back in August for this event and I wanted to get it done early on in October, so their would still be time to do all the fun things that crop up at the end of October (which is exactly what happened :) It actually started out as a stylized photoshoot for my girls and grew...we usually do a fun Halloween party with a game and dinner, so I thought I'd have it serve as both purposes.  Soon my house received a makeover and it became Wonderland.  Looking back, I think I'm going to SIMPIFLY the stylized shoot and do it sometime next year instead.  I had so many people say that they wanted to 'walk through' our Wonderland, but most were too busy, so ... I'm bringing my craziness to you :) 
 
Last year, our house became Hogwarts School of Witchcraft and Wizardry (blog link to those photos here) and we did a 'play' where the kids had to act their characters as they solved the mystery.  I couldn't think of a play for Alice.  Instead, however, I found the walk through to a video game called "Trapped in Wonderland."  I began reading through the cheat sheet and realized that this would be the basis for our party this year.
 
The "Trapped in Wonderland" story for our party ...
When everyone arrived for the 'Frabjious Day Feast' at the Queen's Castle, they found the door locked. 
 
 
The only other option was to go 'Down the Rabbit Hole.' 
 
 
In a small space was a book cabinet and some clues.
 
 
To get through the tiny door the kids had to solve the clues, which would eventually give them a 'key' and a 'drink me' bottle


... that made them small enough to fit through the door.  (Not really, but it was really fun to watch them all squeeze through the door in their costumes .. he he). 
 
 
The small door opened into a flower garden, which were huge, because everyone had shrunk ...he he.  
 
 
At the end of the flower garden was Absolume (the caterpillar), who had a message and instructions on how to get out of Wonderland. 
The message basically said, "You are trapped in Wonderland!  To get out you must fix the portal (which was a mirror that you had to find all the broken pieces to).  Also, to get into the 'Frabjious Day Feast' you have to find the 'Key of Hearts' hidden in Wonderland."
 
 
"Oh, and have a mushroom."  (which allows you to return to normal size) 


From here, the kids entered the 'Wonderland Forest,' where three chests, with locks, were located ...
 
 
The kids could also visit the 'Mad Hatter's Tea Party' ...
at each location there were clues hidden.


Three rooms in our house could NOT be entered until AFTER the code(s) were broken ...
(examples of some of the codes the kids had to break)
 
 
In one room was the Mad Hatter's Workshop ...
 
 
where they had to break another code to find more clues.
 
 
Another room was the time room, with another code to break ...
This room later became the 'White Queens kitchen' and the place where she mixed potion.
 
 
The last room was 'The Cave of the Jabberwalkie,' where the last two clues where hidden in the remains of the Jabberwalkie (the last broken mirror piece, and ...
 
 
the key to the last chest holding the 'Queen of Hearts Key.'
 
 
Once through the portal and out of Wonderland, the kids took the key back to the 'Red Queen's Castle' and entered for the 'Frabjious Day Feast.'
 
 
The kids had sooo much fun solving all the clues and finding the pieces.  My kids had fun helping me with the decorations (which took us a couple weeks :)  and they were so excited to play their parts.  We had some good friends of ours over for dinner the first time.  Later, we did again for a few other people who wanted to 'walk through Wonderland' and the kids played different role parts, while their other friends solved the clues (it was so fun to watch them act their character roles).  I may have gotten a tad bit carried away, he he he, but it was a fun time!
 
 
Costume Role:


Friday, October 16, 2015

Shadow Box Foto Folio

 
Yah!  It's my favorite time of year again - FALL!  This year has just flown by.  I've been focusing on my photography skills and business more this year, and been quite involved with a musical theater lately, so I haven't been doing much paper crafting.  However, I was so excited to pull out the Halloween décor, and find this project again :)  It was a popular one last year, so I thought I'd share it again.
This is a foto folio project that doubles as a home décor piece.  My kids love to get it down and look at the memories hidden within, EVERY YEAR!  It doesn't just sit on a shelf and collect dust  - it is well loved.  Even when company comes they ask about it and enjoy the quick look through (now that is a successful project :)
The pattern for this project is on sale on my website right now (here is the link to the pattern).  And here is the 'how to' you tube video that accompanies the project
 
Happy Halloween!